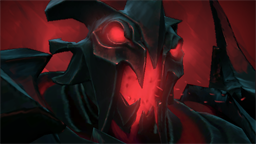
Witch Doctor
A wiry silhouette hitches forward--uneven of feature and limb, bizarre of gait, relentlessly criss-crossing the battlefield in search of that vital weak point where his talents can do most good, and most harm. Whether broken or mismade it is not clear, but still, none can doubt the power carried in his twisted physique. A long staff thumps the earth as Zharvakko the Witch Doctor advances, deploying a terrifying arsenal of fetishes, hexes and spells. It is a body of magical knowledge learned and perfected over several lifetimes in the island highlands of Arktura, now wielded with precision accuracy against his enemies. Zharvakko can be your best friend or your worst enemy--healing allies and laying waste to all who oppose him.
Base STR
20 +2.1
Base AGI
13 +1.4
Base INT
22 +3.1
Move Speed
300
Attack Range
550
Base Armor
0
Attack DMG
26–36
Projectile
1200
Innate Abilities

Gris-Gris
Witch Doctor gets a Gris-Gris, an item that cannot be dropped or placed in the backpack. When the owner dies, 100% of the gold lost from death is added to the item, and will be refunded when the item is consumed. The value of the Gris-Gris is increased by 1 every 3s.
Right-click to consume and permanently remove the item.
Abilities

Paralyzing Cask
Cooldown
20 / 18 / 16 / 14s
Mana
80 / 100 / 120 / 140
Launches a cask of paralyzing powder that ricochets between enemy units, stunning and damaging those it hits. Damage increases each bounce.
STUN DURATION:
0.8
BASE DAMAGE:
55 / 70 / 85 / 100
BOUNCES:
3 / 4 / 5 / 6
BONUS DAMAGE PER BOUNCE:
20
- Targets can be hit multiple times, as long as another unit is struck in between the bounces.
The Witch Doctor recycles the bones of fallen friends and foes, using the powder as part of his arsenal of charms and alchemy.

Voodoo Restoration
Mana
25
Witch Doctor focuses his magic to heal nearby allied units, costing Witch Doctor mana every second Voodoo Restoration is active.
MANA PER SEC:
9 / 12 / 15 / 18
RADIUS:
650
HEAL:
20 / 30 / 40 / 50
- Healing is done in 0.33 second intervals.
- Can heal Spell Immune units.
Zharvakko's hocus pocus is not limited only to hexxing his opponents and is quite adept at curing ailments.

Maledict
Cooldown
30 / 26 / 22 / 18s
Mana
105 / 110 / 115 / 120
Curses all enemy Heroes and player-controlled units in a small area, causing them to take a set amount of damage each second, as well as bursts of damage every 4 seconds based on how much health they have lost since the curse began.
RADIUS:
200
LOST HEALTH BURST DAMAGE:
16 / 24 / 32 / 40%
DURATION:
12
- If an affected hero's health has increased above the amount they had when Maledict was cast, the burst damage will be 0.
Certain voodoo magics can make an enemy regret engaging the Witch Doctor.

Death Ward
Cooldown
100 / 90 / 80s
Mana
200
CHANNELED - Summons a deadly ward to attack enemy heroes within its attack range. Lasts a maximum of 8 seconds. Death Ward has 50% bonus accuracy.
DAMAGE:
60 / 90 / 120
ATTACK RANGE:
600 / 625 / 650
- The Death Ward is invulnerable, and is only destroyed if Witch Doctor is interrupted or its duration expires.
- The Death Ward can be controlled, and made to attack a specific target.
- Death Ward attacks once every 0.22 seconds.
Witch Doctor performs a ritualistic dance, one that haunts the dreams of those who live to recount it.
Talent Tree

Aghanim's Scepter
Death Ward
Death Ward attacks bounce between nearby enemies.

Aghanim's Shard

Voodoo Switcheroo
Cooldown
50s
Mana
200
Turns Witch Doctor into a Death Ward briefly with reduced attack speed. He is hidden during this time.
DURATION:
2.5
ATTACK SPEED REDUCTION:
45
Strategy
When to Pick Witch Doctor?
He is good and situational right now, and that is actually the most honest description of Witch Doctor in the current meta that anyone could give. He is sitting comfortably in the top five position, supporting 5 builds on patch 7.41b according to D2PT data, with the highest win rate build running at 53%. He is NOT the most broken support in the game. He is NOT getting picked or banned in the first phase of every draft. But he is reliable; he is consistent; and—here is the thing that most players completely underestimate—his Death Ward combined with Maledict is still one of the highest raw damage outputs available to any support in Dota 2 at any level of item development. You do not need six slots on Witch Doctor. You do not need Aghanim's Scepter to be relevant. Two levels of Maledict and a Death Ward can kill a hero at fifteen minutes without any items at all if it goes uninterrupted for even four seconds.
Let me explain what Maledict actually does because most players treat it like a DoT spell and are using it completely wrong. Maledict deals damage over time AND deals burst damage at fixed intervals that scales based on how much HP the target has LOST since the debuff was applied. It bursts at the 4th, 8th, and 12th seconds—and each burst deals damage proportional to how much health they dropped during that window. This means Maledict is almost completely useless on a hero who is standing still at full HP healing themselves—and absolutely catastrophic on a hero who is taking any other source of damage while the debuff is active. The combo is Maledict INTO damage, not damage first and then Maledict as a cleanup. Land the debuff, then let your carry, your other support, your own Paralyzing Cask, and your Death Ward—all of it—hit the target while the debuff is ticking. Every point of damage taken amplifies the burst. A carry who has taken 400 damage under a level four Maledict takes a burst tick that alone can kill a squishy support. This is why Spirit Vessel is one of the best items on him—the percentage-based damage from the vessel triggers Maledict's burst scaling in a way that feels completely unfair against high-HP targets.
The 7.41 changes gave Witch Doctor's Death Ward increased attack range—meaning he can channel further away from the fight before the ward starts shooting, which directly reduces the chance of getting interrupted before the channel ends. The level 20 talent where Maledict bursts deal 75% of their damage in an 800 AoE around the primary target is picked by 80.2% of high MMR players right now, and for good reason—it turns every Maledict burst tick into a mini-Black Hole explosion that hits every enemy standing near the primary target simultaneously. This changes the ability from a single-target DoT into an AoE execution tool in five-man fights, and it is why the "Maledict first, Death Ward second" combo feels so much stronger in teamfights than anything Witch Doctor could produce two patches ago.
Pick him into enemy lineups with summons and illusions—Chen, Lone Druid, Lycan, Broodmother, and Phantom Lancer. Paralyzing Cask bounces between the hero AND their controlled units, stunning them repeatedly for the entire bounce duration. A cask thrown at Lone Druid hits the Druid, bounces to the bear, bounces back to the Druid, and bounces to the bear again—the Lone Druid is stunned for effectively the entire duration of the spell with minimal chance of doing anything. Lycan and his wolves? Same story. Chen and his converted creep army? You are stunning Chen for four seconds solid while his creep army is also getting bounced into oblivion. He pairs brilliantly with Enigma — Black Hole into Maledict into Death Ward is the cleanest setup in the game because Black Hole holds everything in place for the full duration of your channel, every burst tick hits every hero frozen in the Hole simultaneously at level 20, and the entire enemy team dies before the ultimate ends. Magnus's Reverse Polarity has the same effect. Any hero that creates forced clustering from which enemies cannot escape turns Witch Doctor's Maledict from a single-target DoT into a team wipe.
What makes him situational rather than universally dominant right now is that the counter list is real and directly tied to how the meta is being played. Silencer's Global Silence goes through BKB and cancels Death Ward mid-channel—no counterplay, no response, just silence and the channel stops. Rubick can steal Death Ward the instant it starts channeling, and a Rubick with stolen Death Ward pointed at your team from across the map is one of the most demoralizing reversals available in the game. Vengeful Spirit has two separate abilities that interrupt Death Ward even through BKB, which is the other BKB-piercing interrupt alongside Global Silence that specifically ruins Witch Doctor. Tidehunter's Ravage is the most common pub counter—the moment Witch Doctor channels Death Ward, Ravage goes out, and the channel is cancelled after one second. Always wait for Ravage before you cast. Always. This is not optional advice — it is the difference between a fight-winning Death Ward and a completely wasted cooldown.
Tips & common mistakes
- Maledict is a SETUP spell, not a cleanup spell. The single most common mistake at average MMR on Witch Doctor is casting Maledict on a hero who is running away at low HP. At that point the burst damage is proportional to almost no HP lost, meaning the ticks deal minimal extra damage. The correct time to cast Maledict is at the START of a fight or a gank, when the target is at full or near-full HP and your carry is about to dump their full damage rotation into them. The more damage taken under Maledict, the higher the burst. Cast it first. Always cast it first.
- · Paralyzing Cask bounces between nearby enemy units in a 500-unit radius. If you cast it at a hero who is standing alone with no enemies or creeps nearby, it bounces once, stuns for 1.5 seconds, and disappears. If you cast it at a hero standing beside another hero, it bounces back and forth between them, potentially stunning each target multiple times. The correct use in the laning phase is to NEVER cast Cask unless the enemy offlaner and their support are within 500 range of each other—because that is when the spell becomes a 4-second double stun that sets up a kill rather than a 1.5-second single stun that accomplishes nothing.
- · Toggle Voodoo Restoration OFF the instant your Death Ward finishes casting. This is an advanced mechanical trick that stops Rubick from stealing Death Ward, because the moment you toggle Voodoo Restoration, your last-used ability is Voodoo Restoration rather than Death Ward—and that is what Rubick's Spell Steal copies instead of the ward. Most pub witch doctors cast Death Ward and stand there doing nothing while the channel runs, giving Rubick a full five-second window to steal it. Toggle Voodoo Restoration immediately after placing the ward and Rubick gets nothing useful.
- · Positioning for Death Ward is the most important decision you make in every teamfight. The ward has a significant attack range—especially after the 7.41 buff—meaning you do NOT need to be inside the fight when you channel it. Cast it from behind your front line, from inside the treeline, from the edge of high ground. The ward shoots from wherever Witch Doctor is standing, and the farther you are from the enemies, the harder it is for them to reach you and cancel the channel. Most pub witch doctors stand in the middle of the fight, cast Death Ward, and immediately get chain-stunned into oblivion. You should be casting Death Ward from a position where the enemy needs to walk THROUGH your entire team to reach you.
- · BKB is not optional if the enemy team has multiple interrupt abilities. I know as a hard support, spending 4000 gold on a BKB feels wrong—that money could be Aghanim's, that money could be Glimmer Cape, or that money could be five wards. But a Death Ward that channels for its full duration behind BKB deals so much damage that it justifies the investment immediately. One full BKB-protected Death Ward in a five-man fight kills more than any other item you could have bought with that gold. Silencer with Global Silence, Ravage, or Vacuum into Wall—any of these invalidate a channeled Death Ward before BKB. With it, none of them work unless they have BKB-piercing interrupts, of which there are very few.
- · The level 20 talent—Maledict bursts deal 75% of their damage in an 800 AoE—is picked by 80.2% of high MMR players, and you should take it every single game. This talent transforms Maledict from a single-target nuke into a team-wiping AoE bomb. The burst ticks at the 4th, 8th, and 12th seconds hit every enemy within 800 units of your primary target for 75% of the burst value each. In a five-man fight where three heroes are standing near the Maledicted target, this is effectively three simultaneous Maledicted bursts per tick—which is a number that kills entire teams without Death Ward even needing to fire a single shot.
Summary
Witch Doctor has always been strong; he is strong right now, and he will be strong on the next patch too—because his fundamental design does not change. Maledict into Death Ward solves team fights. It has always solved teamfights. The only question every patch is whether the meta creates the conditions where those two abilities land cleanly—grouped enemies, no immediate interrupt, and your team being able to follow up while the debuff is ticking.
On patch 7.41b, with the AoE Maledict burst talent and the buffed Death Ward range, those conditions are achievable more consistently than they have been in recent memory.
Pick him into lineups with summons and illusions where Cask runs rampant; always cast Maledict first at the START of a fight, never at the end; position Death Ward from behind your entire team, not inside the fight; wait for Ravage before you channel; toggle Voodoo Restoration to block Rubick; and build BKB when the enemy has multiple interrupt tools.
Do all of that, and Witch Doctor is not situational—he is a guaranteed teamfight win condition every time the cooldowns line up.
Pro Players Known For This Hero